How to setup an Nginx reverse proxy server on Ubuntu using Digital Ocean


A reverse proxy is a software component or server that sits between client devices such as web browsers and one or more backend servers. This is usually implemented to protect web servers from attacks which increases performance, reliability, and security. This also works in opposition to the forward proxy as the forward proxy is an intermediary between the client and the internet.
In this article, I will explain how a reverse proxy works and how to configure it on an Ubuntu server using Digital Ocean as an example. Therefore, let's delve a bit deeper into how a reverse proxy works.
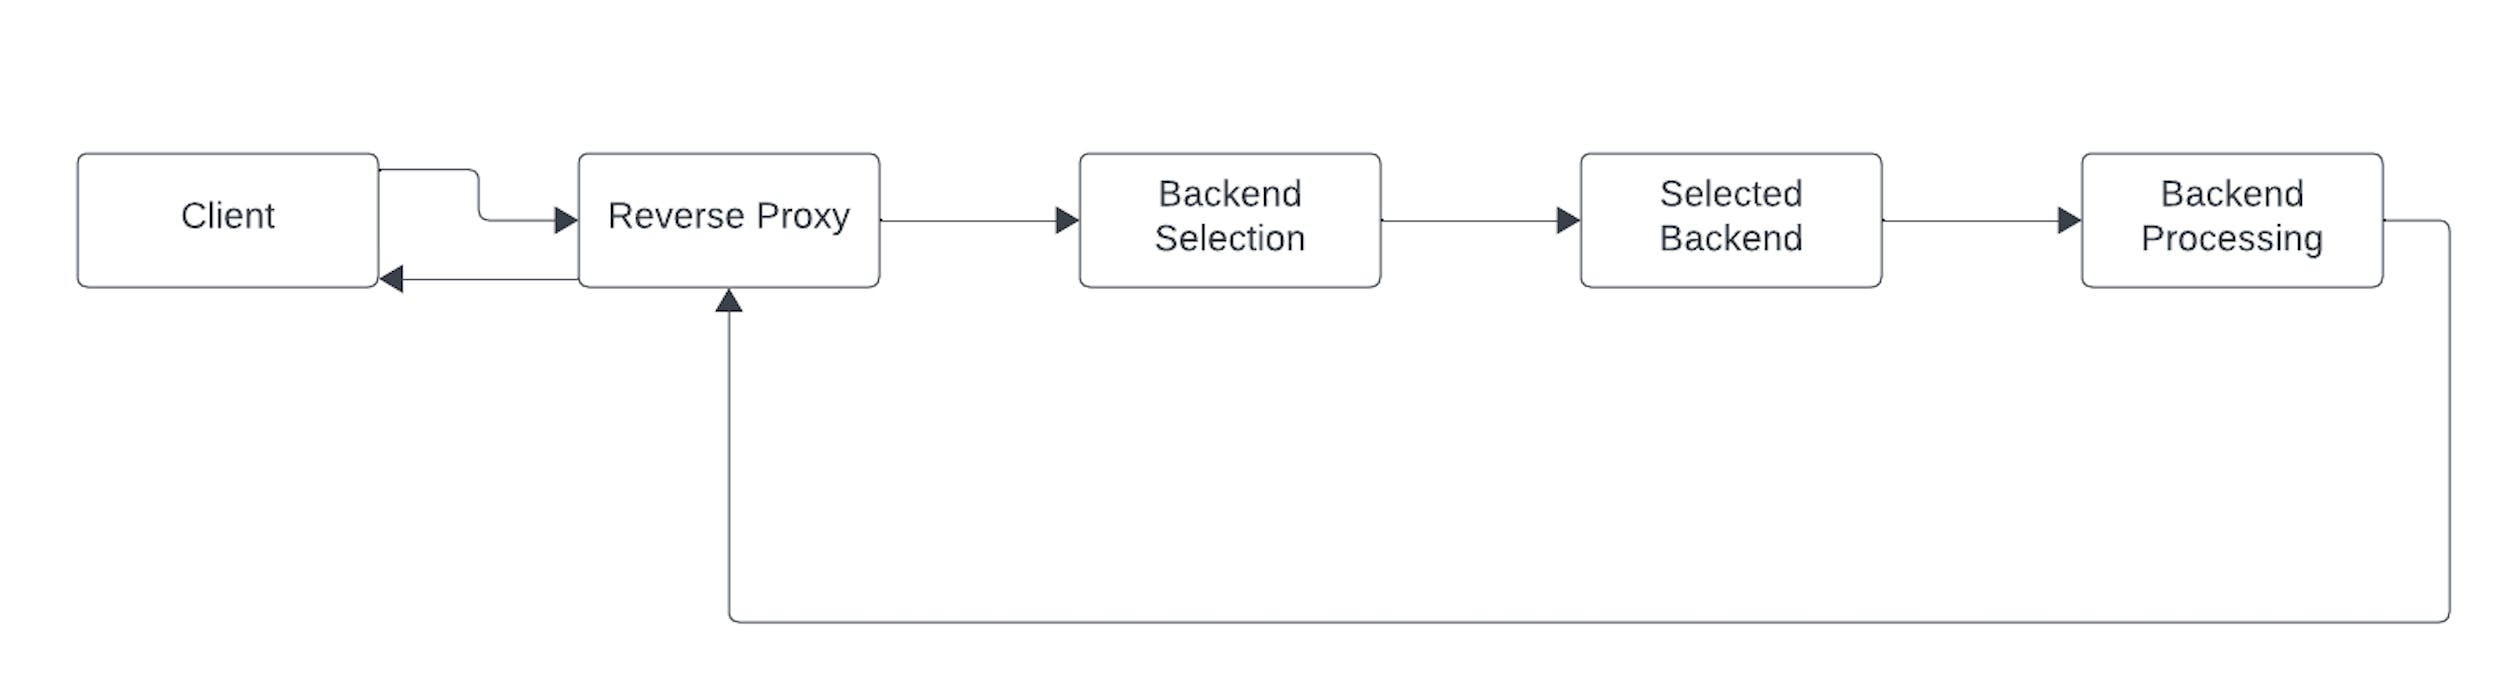
Client sends request: A request is being established by the web browser either by clicking on a link or entering a URL. The request includes HTTP methods (GET, POST, etc.), the resource URL, headers, and any other data.
Request reaches reverse proxy: The request from the client is intercepted with the reverse proxy server which examines the request to know where it can be forwarded. The reverse proxy can be configured to add CORS-related headers to the response it sends to the client.
Backend selection: This is a routing decision mechanism to decide which backend server should handle the request. This can involve load balancing or the rules configured on the reverse proxy and forwarding the request to the selected backend server.
Selected backend: Once the routing decision is made, the selected backend server processes the request just as it would if it were receiving the request directly from the client.
Backend server processing: The backend server processes the request which might involve authentication checks, database manipulation/queries, dynamic content generation or more, and generates a response containing the requested resource and additional metadata.
Response back to the reverse proxy: The generated response is being sent back to the reverse proxy which can further modify or adjust CORS headers before sending the response to the client.
Final response to the client: The reverse proxy sends the modified response to the client. On the client's side, the response comes directly from the reverse proxy and it is the client (browser) makes the final decision on whether to allow the cross-origin request based on the received CORS headers.
It is important to note that if the CORS headers are not present or don't match the browser's security policy, the browser will block the request from accessing the resource.
Configuration
To set up a reverse proxy on an Ubuntu server hosted on Digital Ocean involves several steps. Here's a general guide that can help you:
Droplet creation: Login to your hosted platform account for example DO to create a new droplet (virtual private server that can be deployed and managed within the DigitalOcean cloud infrastructure) with Ubuntu as the operating system and choose the size, region, and other settings.
Connect to your droplet: You can connect to your droplet either via SSH or using the droplet console on the Digital Ocean platform.
ssh username@your_droplet_ip_addressReplace
usernamewith your droplet username andyour_droplet_ip_addresswith your droplet IP address.Install Nginx: Nginx is available for installation using
aptthrough the default repositories. Update the repository then install nginx:sudo apt update sudo apt install nginxPress
yto confirm the installation and pressENTERto accept the defaults. Once the installation is successful, you can verify if nginx is running using:systemctl status nginxConfigure your server block: Create and open a new nginx configuration file using
nanoor any preferred editor:sudo nano /etc/nginx/sites-available/defaultInsert the code below into your new file and save and close the configuration:
 server {
   root /var/www/html;
   server_name your_domain_name.com www.your_domain_name.com;
   location / {
     proxy_pass http://localhost:8080;
     proxy_http_version 1.1;
     proxy_set_header Upgrade $http_upgrade;
     proxy_set_header Connection 'upgrade';
     proxy_set_header Host $host;
     proxy_cache_bypass $http_upgrade;
   }
 }
Note in the location block, that other configurations such as CORS can handled there.
You can now test your configurations for syntax errors:sudo nginx -tAnd lastly, restart your nginx server to apply your changes:
sudo systemctl restart nginxWhen everything works perfectly without errors, you can visit localhost:8080 on your browser to see the default webpage provided by nginx which signifies that your nginx server is up and running successfully.